Luxury Restroom Trailers for Corporate Events
June 10, 2025
In the corporate world, first impressions and attention to detail are crucial. Whether you’re hosting a product launch, a networking…

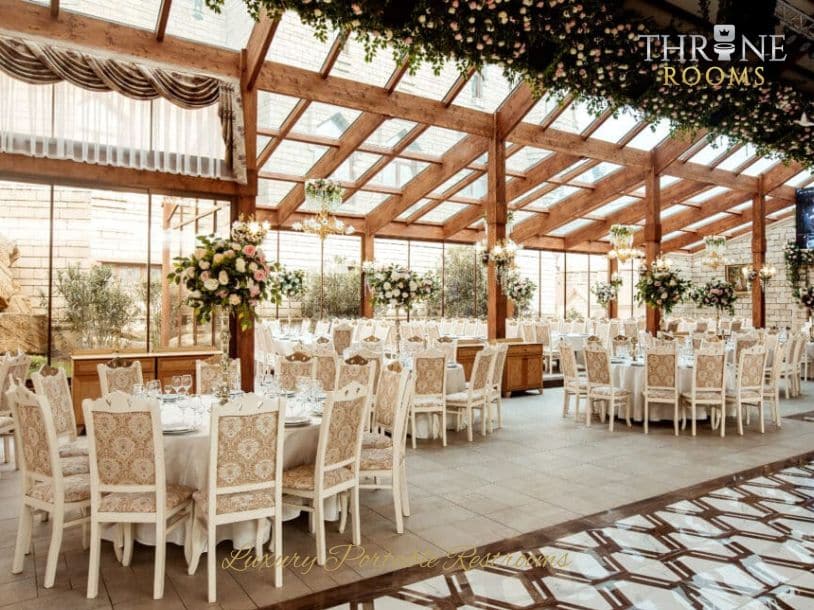
Planning the perfect backyard wedding in Virginia involves countless details, and one of the most critical for guest comfort is your restroom trailer rental. Unlike standard options, a luxury portable restroom provides an elegant, comfortable experience that matches the beauty of your special day. This guide covers everything you need to know about power, water, and access for your portable restroom trailers to ensure they run seamlessly and discreetly.
You’ll size generators to match loads, place them away from guests, and use barriers to cut noise. You’ll protect cords with covers, use GFCI, and keep routes ADA-stable. Water can come from a hose bib or onsite tanks; plan for pressure, flow, and waste handling. Light pathways softly and shield fixtures. For a luxury bathroom rental for events, this checklist is your key to success.
Before you pick a generator for your portable restroom trailers, list every powered component and its wattage. Include interior lights, exhaust fans, water pump, heater strips, winterization heaters, handwashing sink heater, and any ADA lift. Note running watts and starting (surge) watts for pumps and compressors. Add them, then apply a 20–30% safety margin. If you’re powering multiple trailers, calculate per unit, then sum.
Choose an inverter generator with clean power (≤5% THD) to protect pumps, LEDs, and controls. Confirm voltage and plug type match the trailers’ shore power inlets. Size fuel capacity for your event’s duration; plan refueling only during lulls. Use separate circuits for pump/heater loads and lights to prevent nuisance trips. Bring spare cords, GFCI protection, and weatherproof connections. This is a key step in planning your portable bathroom rental.
Even with reliable power sorted, you still need to control noise so guests can talk and the ceremony audio stays clean. Place generators and restroom service equipment 50–100 feet from seating, bars, and photo areas, with a direct but discreet path for refills. Aim exhaust away from guests and structures. Use terrain: put units behind a garage, hedge, or outbuilding to break line-of-sight noise. Add barriers—plywood panels with mineral wool, acoustic blankets, or rented sound shields—leaving ventilation gaps. Set rubber isolation pads under equipment to cut vibration. Keep doors and service panels closed. Schedule pump-outs and restocking during shifts. Run a sound check at event volume and adjust placement. Post clear signage so guests find restrooms without clustering near noise.
Whether your celebration is in a Richmond backyard, a Fredericksburg estate, a Charlottesville vineyard, or anywhere in between, these principles are universal. At Throne Rooms, we specialize in delivering and setting up premium restroom rentals across Virginia, including Williamsburg, Petersburg, and Ashland. Our team handles these complex logistics for you, ensuring your bathroom rental for your wedding is perfectly integrated into your venue.
While restroom rentals seem simple, their power needs can trip breakers or create shock hazards if you wing it. Map every load: lights, exhaust fans, heaters, hand dryers, and pump controls. Check nameplates and add wattages; divide by 120 to estimate amps. Keep circuits below 80% of breaker rating. Use dedicated 20-amp circuits for heat or high-draw accessories.
Run only outdoor-rated, 12- or 14-gauge extension cords; match cord gauge to load and distance to limit voltage drop. Keep cords off walkways, tape or ramp crossings, and protect from vehicle traffic. Use GFCI protection at the source (receptacle or breaker) and test it before guests arrive. Elevate connections, use in-use covers, and avoid daisy chains. Label circuits and keep a reset plan handy.
With power sorted, turn to water. Decide between tapping an on-site spigot or bringing standalone tanks for your luxury portable restroom. On-site hookups are simple if pressure is steady (40–60 psi) and frost-free valves work. Use potable hoses, backflow protection, and a pressure regulator if lines are old. Standalone tanks add flexibility where pressure is weak or distance is long; pair with a demand pump and food-grade hose.
Proper water planning is what sets a high-end restroom trailer rental apart.
Start by mapping all waste streams: restroom effluent, handwashing graywater, and any janitorial liquids. Define a pumping and disposal schedule based on guest count, restroom type, and event duration, and confirm vendor capacity and access. Document who’s responsible, where trucks stage, and how you’ll prevent spills and odors.
Before guests arrive, map every waste stream so your sanitation plan matches real needs. Identify where waste originates, where it travels, and who handles it. Tie each stream to locations, container types, and movement routes so staff and vendors act fast and avoid cross-contamination.
Once you’ve mapped streams and volumes, lock in a pumping and disposal schedule that matches peak load and local rules. Confirm permit needs, hauler licensing, and allowable disposal sites. For portable toilet rentals plan one pre-event pump, mid-event standby if guest count exceeds capacity, and an immediate post-event pump. If you’re tying into a septic tank, verify tank size and condition; schedule a preventive pump 1–2 weeks prior if the tank is near 70% full.
Set thresholds: trigger a service call when units hit 70–80% capacity or when sinks run low. Coordinate access windows for trucks, weight limits, and ground protection. Document chain-of-custody, volumes removed, and disposal receipts. Add contingencies: backup hauler contact, spill kit, and greywater holding buffer.
Even as daylight fades, guests still need to find and use the restroom safely, so plan lighting that’s soft on the eyes yet bright enough for clear wayfinding. Use warm-white LEDs (2700–3000K) to reduce glare and preserve ambiance. Aim for consistent, shadow-free illumination from path to door to interior, and avoid fixtures that flicker or hum. Keep light spill minimal to protect neighbors’ comfort.
Guarantee each restroom route meets the ADA minimum clear width (36 inches continuous, 32 inches at doorways). Choose a firm, stable, slip-resistant path surface such as compacted gravel fines, asphalt, or mats rated for mobility devices. Keep slopes gentle (max 1:20 for walkways) and remove trip hazards so guests can move safely.
Two key numbers guide ADA-compliant pathways to backyard restrooms: 36 inches minimum clear width along the route and 32 inches minimum at short pinch points (no more than 24 inches long). Measure the entire approach from driveway or entry to the restroom door. Keep protrusions—stakes, decor, shrubs—out of the clear passage. Where the path narrows, confirm you meet the 32-inch rule and limit the length of that restriction. Maintain the width at turns and through gates.
One rule matters as much as width: the route must be firm, stable, and slip-resistant from arrival to restroom. Grass, gravel, mulch, and wet decks fail under wheels and heels. Provide a continuous surface that won’t rut, shift, or get slick when damp.
Use compacted crushed stone with fines, asphalt, concrete, or interlocking pavers with tight joints. For temporary installs, lay heavy-duty access mats or ADA-rated event flooring over geotextile. Keep cross slope under 2% and running slope under 5% where possible; add handrails if steeper. Bridge hose and cord crossings with beveled covers.
Sweep debris, secure edges, and light the route evenly. Add slip-resistant treads at ramps. At the unit, create a level, non-shedding pad the same material as the path.
Before guests arrive, map clear paths for foot traffic and service access so heavy use doesn’t churn up turf or crush beds. Keep restroom routes direct, wide, and stable. Use ground protection where wheels or repeated steps will stress soil. Separate guest flow from service runs to prevent bottlenecks and lawn damage.
Even on a tight budget, you can secure clean, reliable restroom service by booking early, comparing apples-to-apples quotes, and locking in delivery windows that fit your setup. Ask vendors to itemize delivery, pickup, service frequency, waste disposal, taxes, and fuel surcharges. Confirm unit size, sink type, interior lighting, and ADA options. Bundle portable restroom rentals with handwashing and sanitizer to reduce separate trip fees.
Schedule delivery 24–48 hours before setup; place units before tent staking and rentals arrive. Stagger pickup to avoid post-event congestion. Share your site map, power plan, and water sources so the provider brings correct hoses, cords, and adapters.
Coordinate with your planner, caterer, and tent team on access routes, turning radiuses, ground protection, and quiet hours. Assign one on-site contact with authority to approve adjustments.
Planning the perfect restroom setup is crucial for your guests’ comfort and your peace of mind. Why navigate the complexities of generators, water hookups, and ADA compliance alone?
Let Throne Rooms handle it. We provide top-tier luxury portable restroom and luxury restroom trailer rental solutions, taking care of every detail from delivery and setup to power management and discreet waste disposal.
Get a free, personalized quote today and ensure your special day is remembered for all the right reasons.